Creating High Availability Webserver Architecture with AWS CLI
Command Line Interface or CLI is the easiest and fastest way to do any task and in our previous article we discussed about how to get started with AWS CLI where we created a new key-pair to access our instance, then we launched an instance using Amazon Linux2 AMI and then created an EBS volume which we attached to the same instance later on with the help of CLI only. Today, we are going to move one step further continuing from the same. We'll create a complete high availability webserver infrastructure on AWS using different services integrated altogether. We'll try to keep our infrastructure failsafe or immediately recoverable. So, what's the exact goal that we are going to achieve today :-
- Configure Webserver on EC2 Instance
- Make Document root (/var/www/html) directory persistent by mounting EBS volume on it
- Static Objects like pictures or videos should be stored in AWS S3
- Create cloudflront CDN distribution which will serve objects from S3 and then use cloudfront url to serve static objects on the Webpage
Excited for this? Let's start with the tutorial
Launch an EC2 Instance
First of all we'll create a security group named WebSG in which we'll allow port 80 which is the default port for HTTP protocol so that we can access our webserver and port 22 for the SSH so that we can access our instance to make any changes inside it, run the following commands for the same and for the detailed explanation, read the previous article which I mentioned above:
1. aws ec2 create-security-group --group-name WebSG --description "Security Group for Web Architecture"
2. aws ec2 authorize-security-group-ingress --group-id sg-08d8c21db1b857698 --protocol tcp --port 22 --cidr 0.0.0.0/0
3. aws ec2 authorize-security-group-ingress --group-id sg-08d8c21db1b857698 --protocol tcp --port 80 --cidr 0.0.0.0/0
Replace my security group id with yours in step 2 & 3 with the id you'll receive from step 1. Our security group is ready and we'll use this security group and the MyNewKey.pem Key-Pair file which we created in previous article and then attach to the instance we are going to launch now. We'll use AMI id of Amazon Linux2 and Instance type will be t2.micro which is allowed in Free Tier. Use the following command to launch the instance:
aws ec2 run-instances --image-id ami-0eeb03e72075b9bcc --instance-type t2.micro --count 1 --security-group-ids sg-08d8c21db1b857698 --tag-specifications 'ResourceType=instance,Tags=[{Key=Name,Value=WebOS}]' --key-name MyNewKey
We have given our instance a name WebOS using tags and don't forget to replace security group id with yours during the launch of an instance. After this, you'll get an instance-id and availability-zone which we'll need in further steps, so note them down.
Create and Attach EBS Volume
Our next step is to create and attach EBS volume to the instance we launched above. We also discussed this in the previous article in detail, to create and attach an EBS volume, run the following commands. We'll create EBS Volume of 1GB only which is more than enough for our practical.
1. aws ec2 create-volume --size 1 --availability-zone ap-south-1b
2. aws ec2 attach-volume --volume-id vol-06c8c704ee35bfd5f --instance-id i-0615b50214f19de3c --device "//dev\sdg"
Remember to replace availability-zone and instance-id with yours which you received while launching an instance and volume-id you'll receive in step 1 when we create a new volume. This volume will be attached to our instance which we launched above as /dev/xvdg, you can give any name as /dev/sdh or /dev/sdb etc. but on the instance 's' will be replaced by 'xv' and you'll see a device by the name '/dev/xvdg' etc.
Webserver Configuration and Persistent Volume
We had already done all the above steps in our previous article and now we are going to start further. We'll connect to our instance using SSH and then configure webserver, format the volume and mount it on the Document root of the webserver.
Get public ip address of our instance using the command:
aws ec2 describe-instances
Connect to the instance using SSH:
ssh -l ec2-user -i MyNewKey.pem 3.108.59.71
Here ec2-user is the default username of the Amazon Linux2 AMI and replace IP address with the public ip of your instance, make sure your key is in the same directory where you are running the command or change it to full path where you have your key and change the name of key too if you had given any other name.
Install Git and Apache httpd:
sudo yum install httpd git -y
Format the Volume in ext4 format:
1. sudo fdisk -l
2. sudo mkfs.ext4 /dev/xvdg
You can check the volumes attached to your instance using first command where you'll see one root volume of 8GB and other extra volume which we attached to the instance. Replace device name that you got in the first command for your attached volume with the device name in the second command and your volume will be ready to use. We need to format a volume or partition in order to use it. It creates partition table or the index of the volume after formatting. It also tells which file system to use, as NTFS is Windows file system format and ext4 is Linux filesystem format.
Make Document root persistent by mounting the volume on /var/www/html:
1. sudo rm -rf /var/www/html/*
2. sudo mount /dev/xvdg /var/www/html
In the first command, we clear the default data from the document root and then By second command, we have improved the data loss for the website, as if EC2 instance crashes, we can just detach the volume from the this instance to any other and our data will be safe as it is.
Clone git repository with the website code into /var/www/html
sudo git clone https://github.com/dheeth/httpd.git /var/www/html
Restart and Enable Webserver:
1. sudo systemctl restart httpd
2. sudo systemctl enable httpd
We restarted httpd server for the changes to take place and enabling means we don't need to restart the server again and again whenever we restart our system or instance. Now You can visit the website on the public ip of your instance. Our webserver configuration is completed now and we have made our document root persistent by mounting the volume on it. Next we need to create S3 bucket and then upload data in it. After that we'll create cloudfront distribution.
Create S3 Bucket and Upload Files
Now S3 is the object storage service provided by AWS which can only be used to store files just like Google Drive. It's free tier provides 5GB of free storage to the users. AWS says that any data stored in S3 will have 99.999999999% durability that it will never be lost as it automatically replicates data to multiple availability zones to provide this. Now, to use S3 we need to create a bucket - think of it like a folder or directory but it should have a unique name for it because that will be the url to access it. To create an S3 bucket, use the following command:
aws s3 mb s3://dheeth-bucket
mb means make bucket and I have given it a name dheeth-bucket in region ap-south-1 which is default in my CLI, names can be same in different regions. With this, our bucket will be created. Now we can use it to store our files. Use the following command to copy some file from your local storage to s3 bucket
aws s3 cp pawan.jpg s3://dheeth-bucket
cp means copy and replace pawan.jpg with the path to your file that you want to upload and dheeth-bucket with the name of your bucket. By default, S3 blocks all public access and we'll keep it as it is only. We'll only allow cloudfront distribution to access our objects in the bucket and we'll block it's access also to the whole bucket. So that only our objects can be accessed using the cloudfront CDN.
Create Cloudfront Distribution
Now when we have most of the things ready, it's time to create a CDN (Content Delivery Network) for our static files stored in S3. Cloudfront is CDN service provided by amazon web services which has their own Edge Locations all over the world. It stores the file in the cache memory to the nearest edge location of the user after first hit to serve the content faster and with low latency.
To create a cloudfront distribution, we'll first create an Origin Access Identiy (OAI) which will be used further to access S3 objects stored in the bucket. It's like a security group for the instance, to create an OAI use the following command:
aws cloudfront create-cloud-front-origin-access-identity --cloud-front-origin-access-identity-config CallerReference="dheeth.netlify.app",Comment="public-access-identity"
You can give any CallerReference and Comment of your choice while creating origin access identity but it must be unique. Note down the id of OAI which you'll get after running the above command.
Now we'll attach this OAI to the cloudfront distribution which we'll create now using the following command with the help of a config file:
aws cloudfront create-distribution --distribution-config file://distribution-config.json
In the config file, replace CallerReference, Bucket Name, Id, TargetOriginId and OAI id with yours before running the command. Also, CallerReference in this file is different from the OAI CallerReference. Our distribution is ready and you'll get the distribution url (DomainName) when you run the above command. You'll be able to access all the files using the Cloudfront domain name.
Update Bucket Policy
Now, one last thing is left, we need to update our bucket policy to allow Cloudfront to access objects in our bucket. We'll use json config to update bucket policy from command line. Replace bucket name and Origin Access Identity in the json file before running the command given below:
aws s3api put-bucket-policy --bucket dheeth-bucket --policy file://bucket-policy.json
Replace bucket name with yours and we are done with the Infrastructure. Everything is ready, now you can access your files in S3 bucket using cloudfront url like <cloudfront domain name>/<filename>. For example - http://d3rl22c8ufepd8.cloudfront.net/pawan.jpg
Replace Files Url with Cloudfront
Now connect to the instance again using SSH as described above and replace the url of our image in the html file with the cloudfront url so that our files are served using CDN which are stored in S3 bucket. Inside the instance:
Change directory to the Document root /var/www/html
cd /var/www/html
Open command line text editor using vim and edit index.html:
1. sudo vim index.html
2. press i to start editing (insert)
3. Edit the image source with the cloudfront url
4. press :wq and hit enter to save (write and quit)
5. sudo systemctl restart httpd
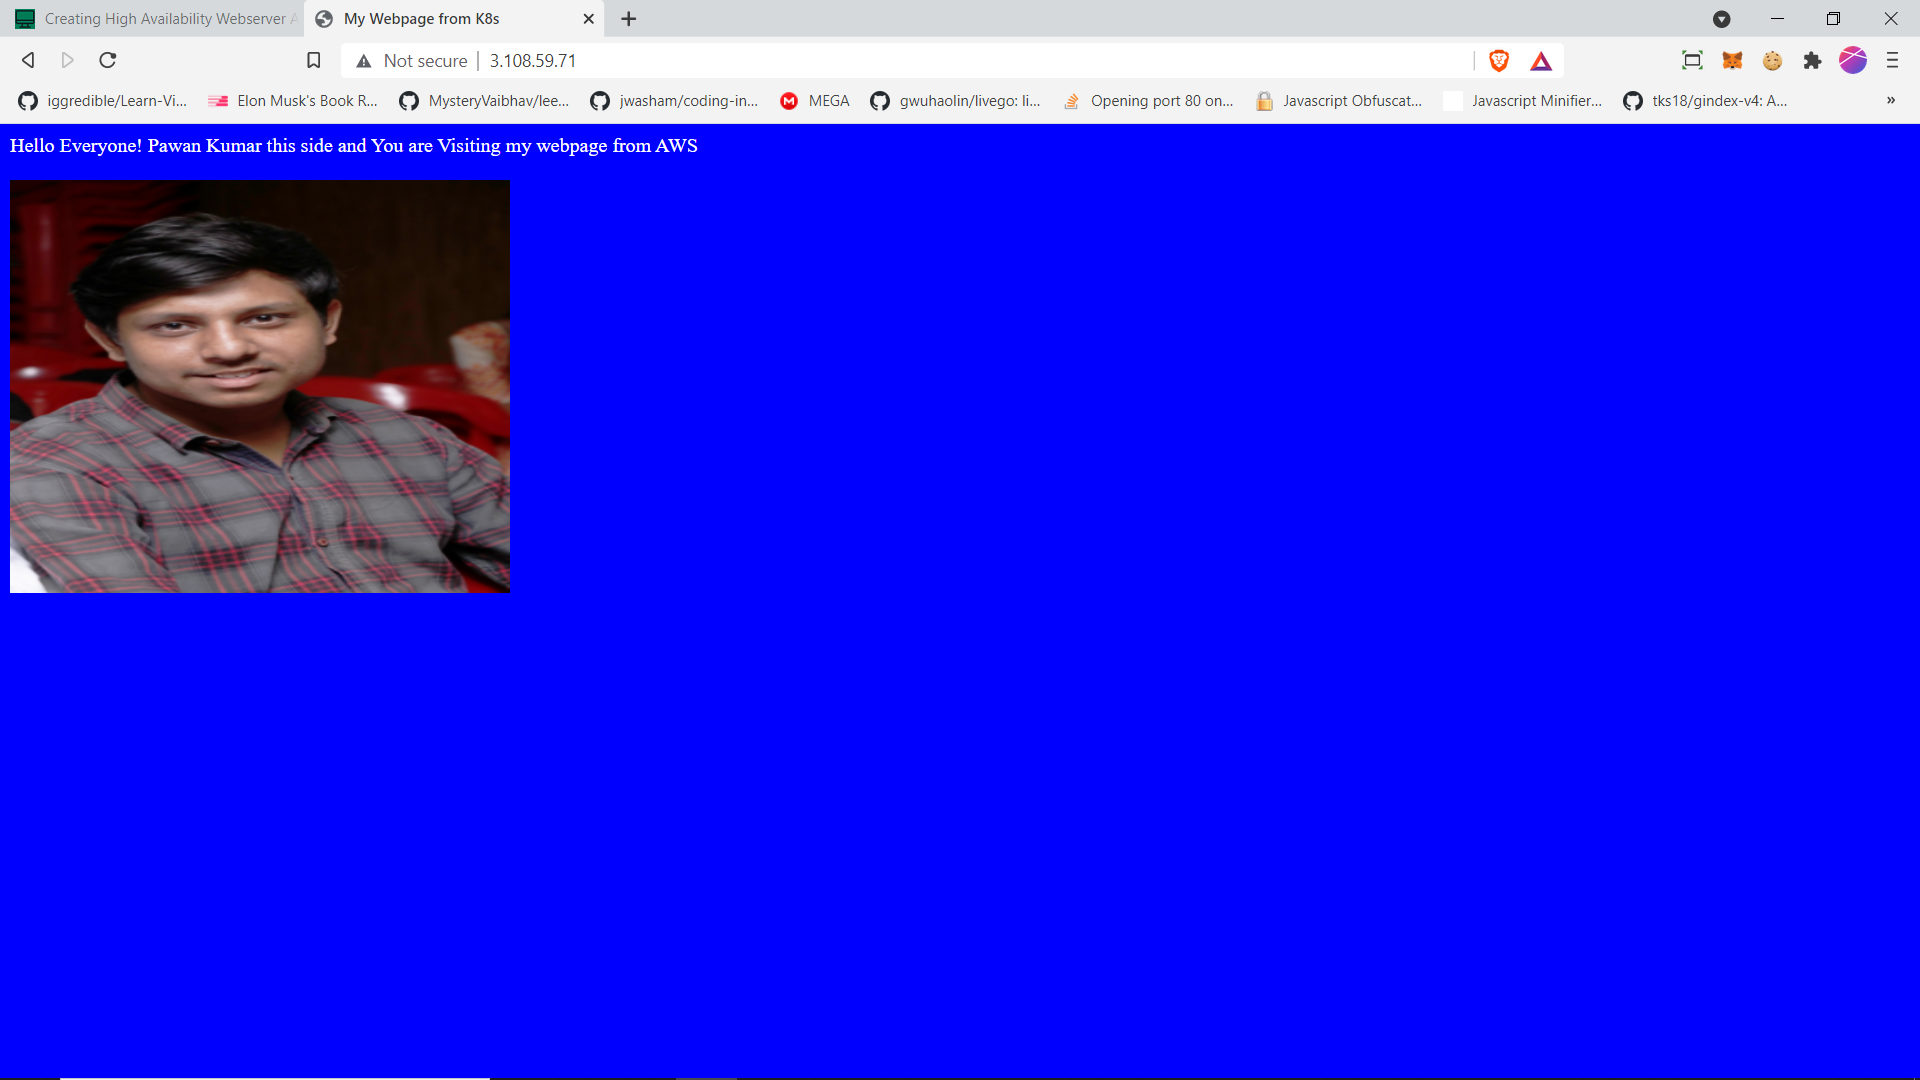
Visit your website hosted on the public ip of your instance and We have our full fledged high availability webserver up and running.
Below is the Screenshot Attached of my Webserver having Image from the CLoudfront CDN:
If you liked the tutorial, do share it with your friends and colleagues so that they can also get benefit from this. Also, if you want new updates of our articles Join Our Telegram Channel. Thanks for being such a patient reader.
Enjoyed this post?
Get AI + DevOps insights delivered to your inbox. No spam, unsubscribe anytime.