How to Contribute Fixed Amount of Storage to Hadoop Cluster

Hadoop is the most used tool in Big Data world and when we talked about how does hadoop store data, I didn't mention there that in hadoop master slave architecture, when you connect your folder to the cluster as datanode, it automatically gets all the storage available in your hard disk. Now, most of the time we do not want to contribute the whole storage and we want to contribute a specific amount of storage as we like but don't know how to do that. So, in this tutorial I am going to solve that problem of yours. It can be easily achieved by simple concept of partitions and I am going to show this demo on a linux operating system.
Creating a Linux Partition
To demonstrate this part, we'll use AWS EC2 instance and attach an EBS volume to it. We'll create new partition as LVM (Logical Volume) so that we can reduce or extend it however we like as to what amount of storage we want to contribute to the hadoop cluster. For demonstration purpose, I am using Redhat Linux 8 instance from AWS.
First of all, switch to root user using the command:
sudo su - root
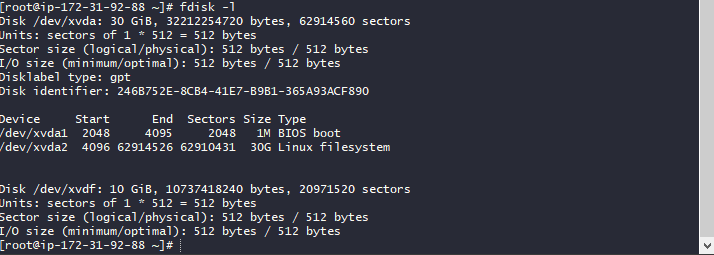
Now, to check all the volumes or hard disks attached to your system, run the following command:
fdisk -l
It will show that you have 2 volumes attached to your instance as shown in screenshot below. One of them is our root volume which has 2 partitions and the other one is that which doesn't have any partition created, the newly created volume which we attached:
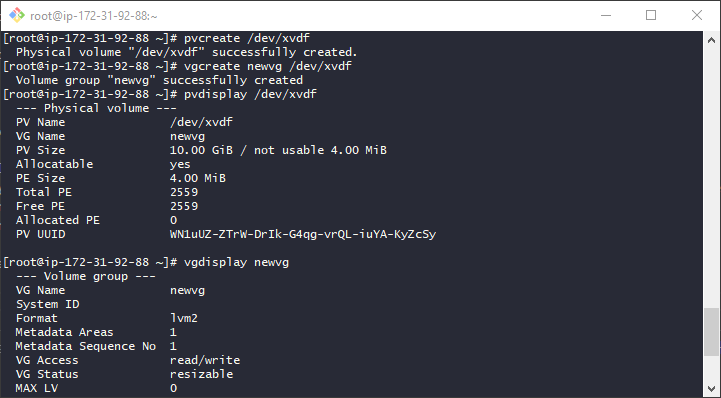
Now, we'll create the new volume as PV (Physical Volume) and then we'll create VG (Volume Group) which has the capability to combine multiple logical volumes or reduce or extend one logical volume from the volume group space. To create the volume as PV, run the command:
pvcreate /dev/xvdf
where /dev/xvdf is the name of new volume given by our system, this maybe different in your case. Now, physical volume is created. If you see an error like pvcreate command not found, then install it using the following command:
yum install lvm2 -y
To see details of the PV created, run the command:
pvdisplay /dev/xvdf
Now, we need to create volume group out of it. To create a VG, run the command:
vgcreate newvg /dev/xvdf
This command will create a new VG named newvg. You can give any name here instead of newvg whichever you want. Also, if you want to create a volume group of multiple volumes, then write names of all the volumes one by one at the end of vgcreate command separated by single space. To see the details about your VG, run the following command:
vgdisplay newvg
Now, we have our volume group ready, we can create as many partitions as we want from it whereas normal partition has a limit of 3 primary and 1 extended partition. The partitions we create from VG are called as Logical Volumes (LV). So, we need to create an LV now in order to use it. To create an LV, use the command:
lvcreate --size 2G --name mylv1 newvg
Here 2G is the size of 2GB we have taken for partition from the size of total 10GB volume group and mylv1 is the name given to the new LV and newvg is the name of volume group from which we are taking the space to create a partition. To display any LV, use the following command. Name of VG is necessary to get details of any LV:
lvdisplay newvg/mylv1
To display all the LVs, simply run lvdisplay and you'll see what you want.
Mounting a Partition in Linux
To use any hard disk, we need to create partition out of it and to use that partition, we need to mount it somewhere. In Linux, we mount the drive on some folder and that folder is called Mount Point. In case of windows, it's called Drive. Now, to mount a partition, we need to follow 3 simple steps :-
Format the Partition
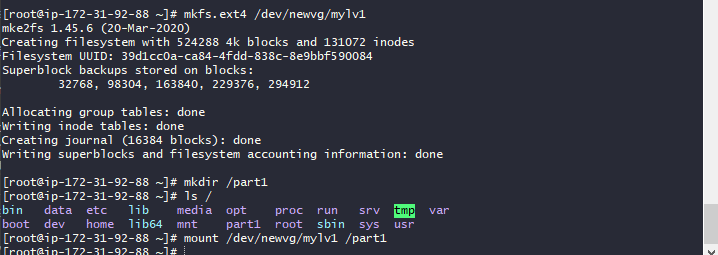
We need to format the partition in some format like EXT3, EXT4 or XFS etc. in linux the same way we have NTFS format so that it can create a partition table or iNode table which is like an index of any partition. To format a partition in linux, run the command:
mkfs.ext4 /dev/newvg/mylv1
Here, ext4 is the format we used and the other argument is the name of our LV which you can get from lvdisplay for your volume that you have created.
Create a Mount Point
Now that we have formatted our partition, we need to create a folder or directory on which we'll mount our partition. To create a folder in linux, run the command:
mkdir /part1
part1 is the name given to the folder and / in front of it means that we have created the folder directly in / drive of linux. To confirm the creation of folder, you can run the following command to print list of files and folder in / drive:
ls /
You'll get to see a folder named part1 here and now, we'll mount our partition on it.
Mount the Partition
To mount a partition in linux, you can simply run the command:
mount /dev/newvg/mylv1 /part1
Now, the directory part1 has only 2GB space and we can simply use this folder to contribute storage to hadoop cluster as datanode and it won't go beyond the 2GB. So, we have limited the amount of storage to contribute to the hadoop cluster which was our final motive.
Now, the question is - What if we need more storage? No need to worry as LVM is dynamic and we can reduce or extend the space of our LV from the VG as much and as many times we want until the space of VG gets over. Still, if we need more, we can add more volumes and add it to the same VG so that it can contribute it's storage to the cluster too.
Extending a Logical Partition
Firstly, if you want to confirm the mount and space of the folder, you can run the command:
df -hT
It will show all the partitions with their mountpoint, total space and space available free. Now, if you want to extend your partition, simply run the command:
lvextend --size +2G /dev/newvg/mylv1
It will extend your LV by 2GB with Zero Downtime and you don't even need to unmount your partition from the folder for the same which is it's biggest advantage. Now, we also need to update it's partition table. To do that, run the following command:
resize2fs /dev/newvg/mylv1
In case of XFS file system, run the command:
xfs_growfs /dev/newvg/mylv1
It will increase the partition table for 4GB now and you can also confirm the same using -> df -hT as shown in screenshot below:
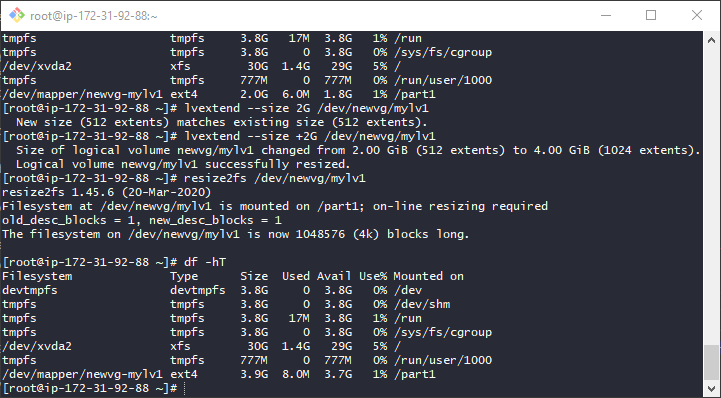
This is clearly showing that the partition had 2GB space first and now it has 4GB space after the extension. Also, if you want to extend the space of VG with new volume or hard disk, run the command:
vgextend newvg /dev/xvdg
Here, /dev/xvdg is the name of new volume added. Name maybe dfferent at your side, confirm using fdisk command.
We have completed our part now and if you liked this tutorial, share it with your friends and colleagues, we'll keep coming with new articles time to time.
Enjoyed this post?
Get AI + DevOps insights delivered to your inbox. No spam, unsubscribe anytime.