Starting a New Friendship With AWS CLI: Command Line Interface

We all know what Amazon Web Services or AWS is capable of and using it from it's Graphical User Interface or GUI is something you can learn from anywhere but this tutorial will help you to get started with AWS command line interface. There are a lot of things which you can't do from the GUI but it becomes possible by integrating the commands with scripting languages like Python or by using AWS CLI itself directly. For every GUI function in any program, there is a command running behind it, so there is nothing that the AWS GUI can do but the CLI can't.
Let's Get Started
For the CLI of specific programs, the good thing is that most of the time the commands are same for every OS, so no need to worry about any command being the platform specific.
Install AWS CLI v2 from Official AWS Website for whichever OS you are using and then confirm the installation by using the command:
aws --version
If you see something like this, then the installation is confirmed and you are good to proceed further

Configure Your Profile
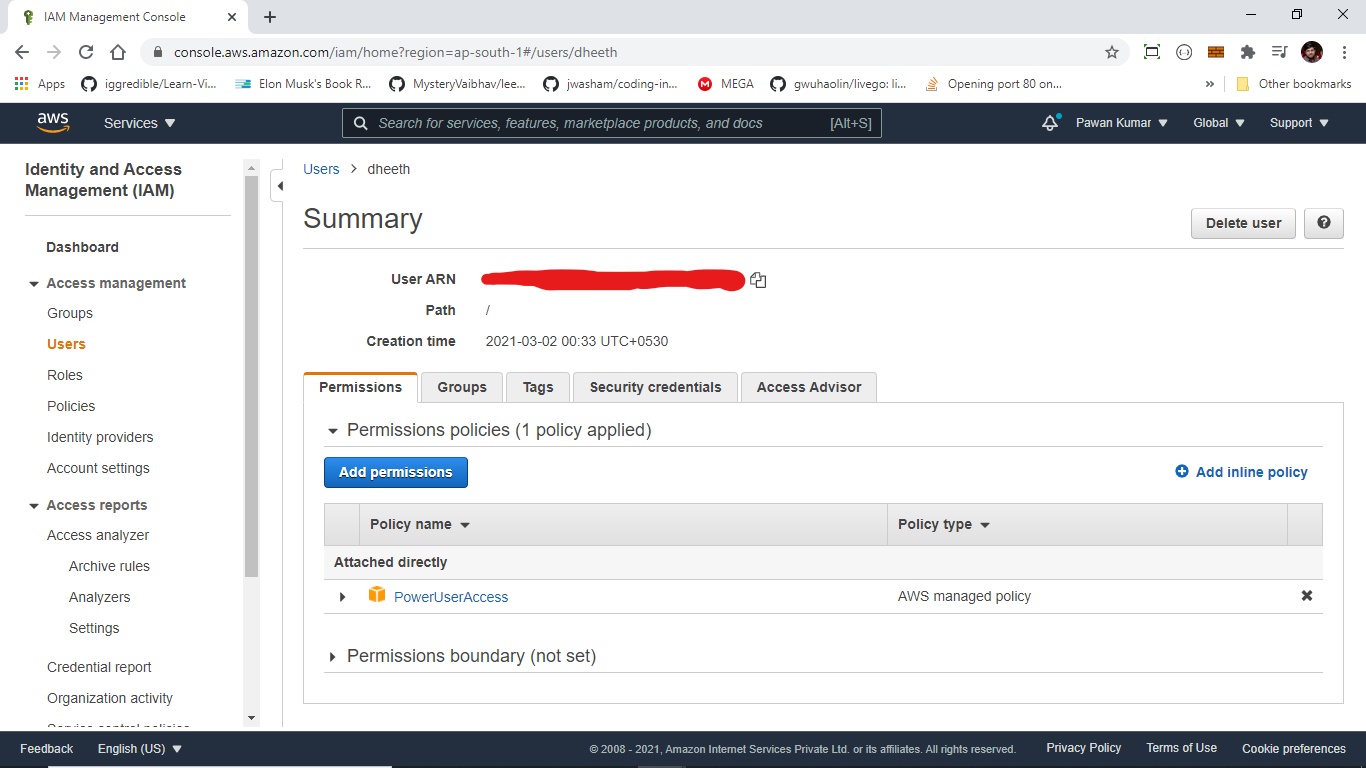
Now the first thing that AWS needs to know is that who is running the commands and from which account, for that we need to login using our username and password to use any service but in case of AWS, it won't login using the email and password you use for the login using GUI. To login in AWS CLI, you need to add a user in IAM through the GUI which will provide you an access key and secret key for your account to login using CLI. At that time you can also assign specific permissions to the user - to provide access to almost everything, provide PowerUserAccess permission and it will work on every service provided by AWS as shown in screenshot below:
Now to login using the credentials of IAM in AWS CLI, run the command:
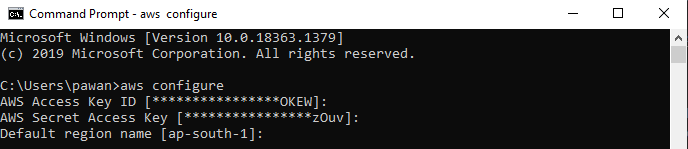
aws configure
Then enter your access key, secret key and it's your choice if you want to set a default region, enter it's id and press enter key. You will be logged in from your AWS account in CLI and now you can do anything you want and integrate whatever you want with your AWS services.
Launch an EC2 Instance
Now let's do something with the CLI, we'll launch an ec2 instance but not directly the instance, we'll also create all the necessary things that we need to launch an instance using the CLI itself and then we'll launch the instance.
What's the Action Plan
- Create a Key Pair
- Create a Security Group
- Launch an EC2 instance using the above created key pair and security group
- Create an EBS volume of 1 GB
- At last, we'll attach the above created EBS volume to the instance launched above
We'll perform each and every step listed above using the AWS CLI only. To get the list of commands supported by AWS and how to use them, run the command:
aws help
Press enter key to keep reading the help page line by line or press space bar to move the help text page by page in the CLI and press q to exit the help text in command line interface.
Creating a Key Pair using CLI
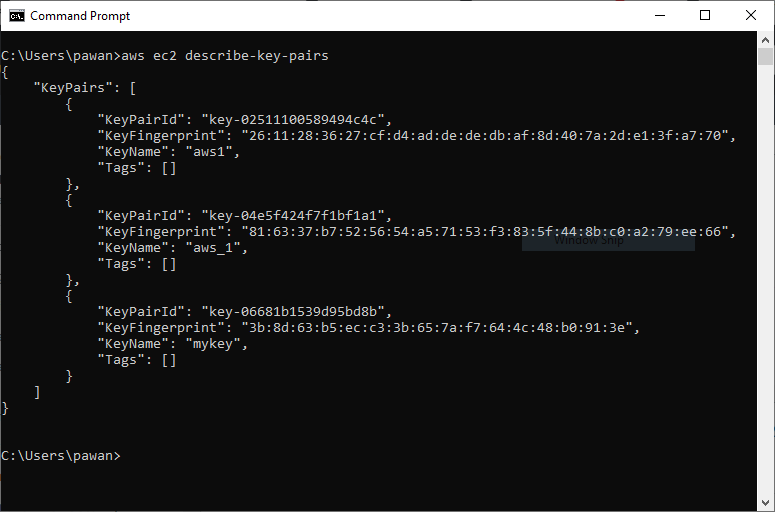
Now, by using the GUI, we know that key pairs are a part of aws ec2 service and we only need to enter a name for the key pair which is a required option. But before that we'll check all the available key pairs in our account and then we'll use the same command to confirm after creating a key pair. To check all the available key pairs, use the command:
aws ec2 describe-key-pairs
It will show the results in json format as shown in the screenshot below:
Now, to create a new key pair, use the command:
aws ec2 create-key-pair --key-name
and then we'll save it in a file with the extension of .pem which can be easily used to sign in the instance using ssh command or OpenSSH program. For example:
aws ec2 create-key-pair --key-name MyNewKey --query 'KeyMaterial' --output text > MyNewKey.pem
It will create a key pair named MyNewKey and then save it in a file named MyNewKey.pem. --query 'KeyMaterial' tells the terminal that there are many things which will be there in the output like key fingerprint, it's name etc. but we want only the key to be stored in the file. Also, I am using GitBash terminal instead of windows default command prompt or powershell as the > file redirection creates some issues in this case on that terminal. Your file will be stored on the same path where your terminal is open and a key pair will also be there in your AWS account. You can use the describe command again to confirm or visit the key pairs section in the GUI of your aws account.
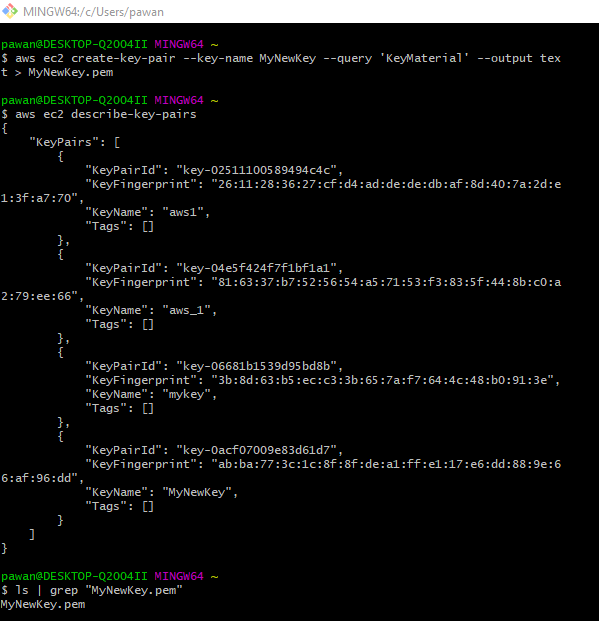
In the above screenshot you can see that a new key pair is created in our aws account named MyNewKey
ls | grep "MyNewKey.pem"
This command is used to search (grep) from a list (ls) of files in the same folder and it's showing that a key file is present that means our command is successful at both the side - local as well as remote.
Creating a New Security Group
Now, for the security group, required fields are the name of security group only same as in the case of key pair and we'll also provide a description to it. After creation of the security group, we'll add the inbound rules to allow port 22 so that we can connect to our instance through ssh. Before and after creating the security groups, we'll also check the security groups available in our aws account to confirm. To check all the available security groups in your account, run the command:
aws ec2 describe-security-groups
It will return the response in the form of json format and now, we'll create a new security group. To create a new security group, use the command:
aws ec2 create-security-group --group-name
By default, the security group will be created in the default VPC but if you want to create the security group in a specific VPC, then you can also provide an option --vpc-id
aws ec2 create-security-group --group-name allow-ssh --description "Automatically allows ssh protocol"
It will return you with group id, copy this because we'll need this group id in next step. You can confirm the security group creation using the describe command, you'll see a new security group there.
Now, we'll allow port 22 for ssh connection to the instances using this security group. For this, use the command:
aws ec2 authorize-security-group-ingress --group-id
If you didn't copy the group id, you can get it from the describe command for your respective security group and 0.0.0.0/0 means that we want to allow anyone to connect to our instance having any IP. For example:
aws ec2 authorize-security-group-ingress --group-id sg-0139d55bc6e24b4d8 --protocol tcp --port 22 --cidr 0.0.0.0/0
Now, that our security group is created, let's move to our next step.
Launching an EC2 Linux Instance
Now, for launching an instance, we need some things like - which AMI (Amazon Machine Image) to use, which security group to attach, which key pair to use, whch instance type to use and then count of instances to launch. Rest everything will be setup default by the AWS. But before and after launching the instance, we'll check and confirm all the instances in our aws account by using the command:
aws ec2 describe-instances
Now, to launch a new instance, use the following command:
aws ec2 run-instances --image-id
We'll use Amazon Linux 2 image id, instance type as t2.micro, same security group id and key pair which we created above, For example:
aws ec2 run-instances --image-id ami-0eeb03e72075b9bcc --instance-type t2.micro --count 1 --security-group-ids sg-0139d55bc6e24b4d8 --key-name MyNewKey
It will return all the details about the instance you just created. You can confirm using describe command, that a new instance is launched and it will be in running condition in few seconds and all of this we have done using the CLI. Now, we need to create an EBS volume and then attach it to the same instance.
To check information about a specific instance, use the option --instance-id. For example:
aws ec2 describe-instances --instance-id i-0035cc46c97f9943f
You'll see all the details of the running instance including public ip of the instance to connect to it. After this, we'll move to our next step.
Creating an EBS Volume
For creating an ebs volume, we need to specify the size of volume means how much GBs we want and the availability zone. Volume is availability zone specific and that's why it should be created in the same availability zone in which your instance is running to which you want to attach the volume. You can know the availability zone from describe instances step given above. To create an ebs volume, use the command:
aws ec2 create-volume --size
We are going to create an ebs volume of size 1 GB and in the zone ap-south-1b, For example:
aws ec2 create-volume --size 1 --availability-zone ap-south-1b
The default volume type is gp2 but if you want to create volume of any other type, then you can specify an extra option as --volume-type. Now our volume is created, you can confirm using the comamnd:
aws ec2 describe-volumes
Copy the volume id and we'll use this to attach to the instance we created above.
Attach Volume to the Instance
Now, when we have everything ready, our final step is to attach the volume to the instance. For this, we'll need volume id which we want to attach and the instance id to which we want to attach the volume and we can get both of these using the describe commands discussed above. To attach the volume to the instance, use the command:
aws ec2 attach-volume --volume-id
Device name should be like /dev/sdf etc. according to linux OS so that it's easy for us to format and use it. Now we'll connect our recently created volume to the instance launched above. For example:
aws ec2 attach-volume --volume-id vol-02934d9b12edf2c0c --instance-id i-0035cc46c97f9943f --device /dev/sdg
If you experience any error like InvalidParameterValue, simply replace /dev/sdg with "//dev\sdg" and it will work. These are called the mangling rules of the terminal. Finally, we have also attached the EBS volume to our instance. Let's connect to our instance and then confirm.
Connection to EC2 Instance
Now, we'll try to connect to our linux ec2 instance using SSH. We'll connect it through the public ip address and the key we stored locally. For Linux, ssh command will work directly, but if you are using windows, Search for "Manage Optional Features", look for OpenSSH and click install. SSH will start working for you in command prompt. To connect to the ec2 instance, use the command:
ssh -l
Default usernames for different linux instances are different. These usernames also differ according to the cloud platforms you use. For aws, Amazon Linux 2 has default username as ec2-user, Ubuntu has username ubuntu and CentOS has username centos etc. In our case, our instance is of Amazon Linux 2 so our username would be ec2-user and public ip you can retrieve from describe instances and key file we already saved when we created a key pair. Before connecting, run the following command so that the key file can be fixed to read only permission. In linux, command will work directly, and if using windows, you can run the command in GitBash terminal.
chmod 400
For example:
chmod 400 MyNewKey.pem
Now we'll connect to our instance having public ip - 13.127.112.138 and we'll use our key MyNewKey to connect:
ssh -l ec2-user 13.127.112.138 -i MyNewKey.pem
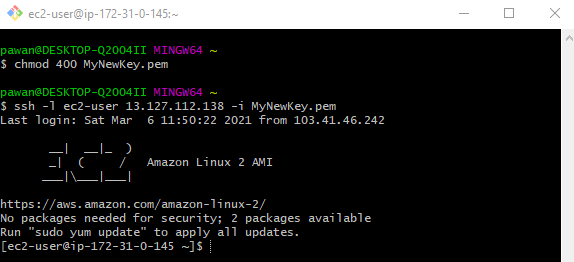
When prompted, type yes and press enter key. You'll be inside your linux instance now. To confirm that there is an additional volume of 1GB that we attached to our instance other than the root volume, run the command:
sudo fdisk -l
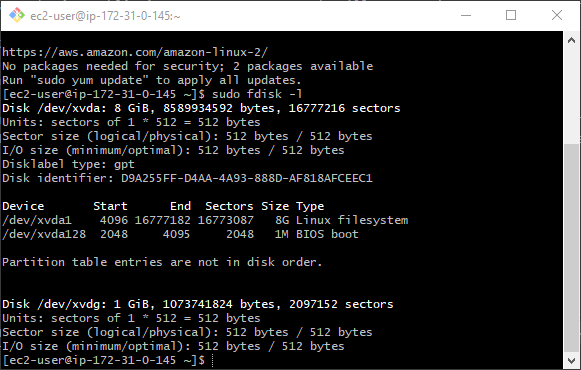
It's clearly visible that we have 1 extra volume other than root of 1GB available in our instance. Now, to use this volume, we need to format this volume and then mount it on some folder. Then we'll be able to use this volume to store files. We'll discuss this in some other article. To exit from the instance, write exit in the terminal and press and enter. If you liked this tutorial, share this with your friends and colleagues and spread the word about our blog.
Enjoyed this post?
Get AI + DevOps insights delivered to your inbox. No spam, unsubscribe anytime.